When it comes to ensuring clean and safe drinking water during your travels, simple RV install water products are essential. Installing a water filter system in your RV can greatly enhance your camping experience. This guide will walk you through the process of installing an RV water filter system, making it straightforward and manageable.
Understanding Simple RV Install Water Products
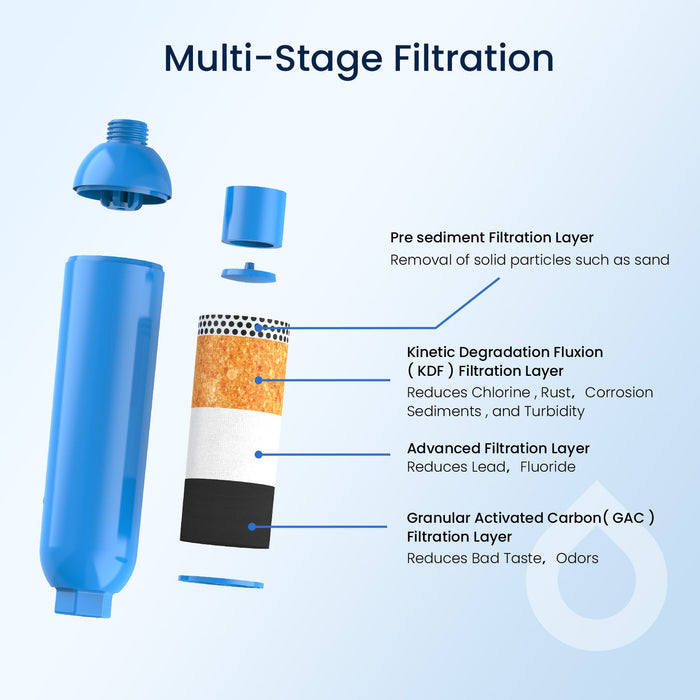
Before diving into the installation process, it's important to understand what simple RV install water products entail. These products are designed to filter out impurities from your water supply, ensuring that you have access to clean water wherever you go. Common types of RV water filters include:
- Inline water filters
- Carbon filters
- Reverse osmosis systems
- UV water purifiers
Each of these options has its own benefits, and the choice largely depends on your specific needs and preferences.
Gathering Your Tools and Materials
To successfully install your RV water filter system, you will need a few tools and materials. Here’s a list to help you get started:
- RV water filter kit
- Adjustable wrench
- Hose clamps
- Plumber's tape
- Bucket (to catch any spills)
Having these items ready will streamline the installation process and minimize potential issues.
Step-by-Step Installation Process
Now that you have your tools and materials, let’s go through the installation process for your simple RV install water products.
- Turn Off the Water Supply: Before you begin, ensure that the water supply to your RV is turned off to prevent any leaks.
- Locate the Water Inlet: Identify where the water enters your RV. This is typically near the water pump.
- Install the Filter: Follow the manufacturer’s instructions to connect the filter to the water inlet. Use plumber's tape to ensure a tight seal.
- Secure Connections: Use hose clamps to secure all connections and prevent leaks.
- Turn On the Water Supply: Once everything is connected, turn the water supply back on and check for leaks.
By following these steps, you can ensure that your RV water filter system is installed correctly and efficiently.
Maintaining Your RV Water Filter System
After installation, regular maintenance is crucial for the longevity of your simple RV install water products. It is recommended to replace the filter cartridges according to the manufacturer's guidelines. This will ensure that your water remains clean and safe for consumption.
For a variety of options, visit Glacier Fresh Filters. They offer a range of products tailored to meet your RV water filtration needs.
In conclusion, installing a water filter system in your RV is a straightforward process that can significantly improve your travel experience. By utilizing simple RV install water products, you can enjoy clean and safe drinking water on all your adventures.